Kapebow Light Star Projector Troubleshooting & Set Up Guide
Are you experiencing issues with your Kapebow Light Star Galaxy Projector? Are you having trouble setting it up or has it suddenly stopped working? You’re in the right place because this article provides solutions to these problems.
This troubleshooting and set up guide will provide you with tips to troubleshoot and instructions to set up your Kapebow Light Star Galaxy Projector. These solutions will help you set up the projector successfully or fix any issues you may encounter during use.
Without further delay, let’s begin setting up your Kapebow Light Star Galaxy Projector or fixing any issues you may be experiencing!
How to Set up Kapebow Light Star Galaxy Projector
Here are the steps to connect your Kapebow Light Star Galaxy Projector:
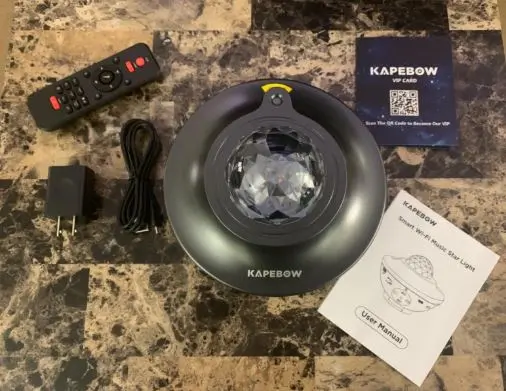
Step 1: Unbox your Kapebow Light Star Galaxy Projector and ensure that all the components are included in the package.
Step 2: Choose a suitable location for the projector, preferably a flat surface such as a table or a shelf, and make sure that it is at a suitable distance from the ceiling or wall.
Step 3: Plug the power cord into the projector and plug the other end into a power outlet. You can also use the included USB cable to power the projector if you prefer.
Step 4: Press the power button to turn on the projector. You should see the projection immediately.
Step 5: Use the remote control to adjust the brightness and speed of the galaxy light projection. You can also choose from different color options and effects.
To change the projection angle, adjust the adjustable stand at the base of the projector.
How to Connect Kapebow Light Star Galaxy Projector to Wi-FI
Here’s how to setup your Kapebow Light Star Galaxy Projector to your Wi-Fi network:
Step 1: Download the Smart Life which is available for free from the App Store or Google Play Store or simply scan the QR code on the user manual to download the app.
Step 2: Tap the “+” button on the App to add the device. On the “Add device” page, select the category of the device.
Step 3: Put the device into Pairing Mode by pressing the reset button for 5 seconds. The indicator light should flash rapidly to indicate its readiness for setup.
Step 4: Tap “Confirm the Indicator light is blinking” and tap next to connect to your Wi-Fi network.
Step 5: Select the 2.4GHz Wi-Fi and enter your Wi-Fi name and the Wi-Fi password to connect the device to the network.
Step 6: Wait for the app to scan for your device and register it to the cloud.
Kapebow Light Star Galaxy Projector Not Connecting to Wi-FI
If you have issues connecting your Kapebow Light Star Galaxy Projector to Wi-Fi, try the following tips to troubleshoot:
- Ensure you entered the correct Wi-Fi password: Open the Wi-Fi list on your phone, click the Wi-Fi name, ignore it, then reconnect and enter the password again to ensure connecting successfully. If not, use the correct Wi-Fi password.
- Check location information on your phone: If your phone cannot show your home Wi-Fi, check if the location information on your phone is enabled.
- Check the Wi-Fi frequency: Ensure your phone is connected to the 2.4GHz network, as other frequencies are not supported.
- Check Wi-Fi name and password: Make sure the Wi-Fi name does not contain Chinese, blank, or special characters. Additionally, check that the Wi-Fi password is not empty and contains no more than 588 characters. Try to avoid using special characters.
- Keep the product close to the network router: During connection, keep the product close to the network router at a distance of 5 meters.
If you’re still having issues, contact the Kapebow customer support team for further assistance.
How to Connect Kapebow Light Star Galaxy Projector to Smart Life App
Here’s how to setup your BlissLights Sky Lite Evolve Galaxy Light Projector with the BlissHome App:
Step 1: Download the BlissHime app which is available for free from the App Store or Google Play Store or simply scan the QR code on the user manual to download the app.
Step 2: Tap the “+” button on the App to add the device. On the “Add device” page, select the category of the device.
Step 3: Put the device into Pairing Mode by pressing the reset button for some seconds. The indicator light should flash rapidly to indicate its readiness for setup.
Step 4: Tap “Confirm the Indicator light is blinking” and tap next to connect to your Wi-Fi network.
Step 5: Continue other in-app instructions to finish connecting your BlissLights Sky Lite Evolve Galaxy Light Projector to the BlissHome App.
Kapebow Light Star Galaxy Projector Not Connecting to Smart Life App
If you are having trouble connecting your Kapebow Light Star Galaxy Projector to the Smart Life app, here are a few troubleshooting steps you can try to resolve the issue:
- Confirm that the projector is compatible with the Smart Life app. Check the manufacturer’s website or the app’s compatibility list to ensure that your projector is compatible. Also, ensure that you selected the correct device type while adding the projector to the app.
- Make sure that the projector has been connected to your Wi-Fi network. Check that your Wi-Fi network is working and that your projector is connected to it because you can’t connect the device to the app without a working network connection.
- Ensure that your projector is in pairing mode. To activate pairing mode, press and hold the power button until the indicator light starts to blink rapidly for Ez mode or slowly for AP mode.
- Move the projector closer to the Wi-Fi router to establish a stronger Wi-Fi signal. Weak Wi-Fi signals can cause connection issues. If this doesn’t work, consider adding a Wi-Fi extender to increase the range and signal of the network.
- Make sure that Wi-Fi, Bluetooth, and location services are enabled on your device, and ensure that it is connected to the same Wi-Fi network as the projector. If these services or functions are not turned on, you may have issues connecting.
If you are still experiencing difficulties after trying these steps, reach out to the Kapebow support team or the Smart Life app support team for additional help.
How to Connect Kapebow Light Star Galaxy Projector to Alexa
In order to control your Kapebow Light Star Galaxy Projector with Alexa, try the setup steps below;
Step 1: The first step is to download the Amazon Alexa app, which is available on the Google Play Store and the iOS App Store. Once you have the app, log in with your Amazon account or create a new account if you are a new user.
Step 2: After logging in to the Alexa app, you will be taken to the homepage. At the bottom of the page, you will see a button labeled “More”. Tapping on this button will take you to a menu of additional options.
Step 3: From this menu, you will need to select “Skills and Games”. This will take you to a page where you can enable different skills, which are like apps for your Alexa device. In order to set up your Kapebow Light Star Galaxy Projector, you will need to enable the Smart Life skill.
Step 3: To enable the Kapebow skill, you will need to search for it within the Skills and Games page. Search for “Kapebow” or “Smart Life” if you can’t find Kapebow and select whichever you can find from the search results. Once you have selected the skill, tap the “Enable to Use” button.
Step 4: After you tap “Enable to Use”, you will be directed to the Smart Life app where you will be prompted to enter your account details. After entering your account details, tap the “Link” button to finish the setup process.
Step 5: Once you have completed the setup process, you will need to return to the Alexa app. After you have returned to the Alexa app, find your projector on the device page. Alexa will have synced all the devices associated with your Smart Life account.
Kapebow Light Star Galaxy Projector Not Connecting to Alexa
To troubleshoot a Kapebow Light Star Galaxy Projector Not Connecting to Alexa, try the following tips:
- Restart both devices. Sometimes, restarting both the projector and Alexa device can help resolve connectivity issues. Turn off the projector and wait for about 2minutes, while waiting, restart your mobile device too.
- Check your Wi-Fi connection and make sure the projector and your Alexa device are connected to the same Wi-Fi network. If they are not, the connection will not work.
- Ensure the smart life app and the Alexa app is up to date. To do this, check for updates in the app store and make sure you have the latest version of the smart life app installed. For Alexa, simply ask Alexa if it’s updated or if its firmware is running its current version.
- Disable and then re-enable the smart life skill. To do this, open the Alexa app, navigate to Skills & Games, find the smart life app and click on Disable. Then, re-enable the skill and try reconnecting the projector again.
- Reset the projector. If none of the above steps work, try resetting your projector to its factory settings. Check your user manual for instructions or check the steps below in the article on how to do this after which you try reconnecting again.
If you are still unable to connect the projector to Alexa, contact the Kapebow or Smart Life support team for further assistance.
How to Connect Kapebow Light Star Galaxy Projector to Bluetooth App
To setup your Kapebow Light Star Galaxy Projector via Bluetooth, try the following setup steps:
Step 1: Download the Smart Life app from your mobile device app store and sign in with your account details. Create a new account if you don’t have an account or you don’t want to use your previous account.
Step 2: Unbox and set up your Kapebow Light Star Galaxy Projector. Turn it ON and ensure that it’s blinking showing it is ready for pairing via Bluetooth.
Step 3: Turn on the Bluetooth function from the settings of your mobile phone and then allow the Bluetooth permission from the Smart Life app.
Step 4: On the “Home” page of the Smart Life app, tap the “+” icon in the upper right corner to enter the device selection page.
Step 5: Select the right category and find the projector that needs to be added
Step 6: After clicking Confirm, the app will start searching for your projector. After finding your device (Kapebow Light Star Galaxy Projector) tap “Add”.
Step 7: Continue other in-app instructions to finish pairing your projector via the Bluetooth app.
Kapebow Light Star Galaxy Projector Not Connecting to Bluetooth
If you’re having issues connecting your Kapebow Light Star Galaxy Projector via Bluetooth, try the following tips to fix the problem:
- Ensure that your device has power and is in pairing mode. Also, check whether the location permission of the App is enabled and that you’ve also turned on Bluetooth and other devices have permission to connect to it.
- Due to Bluetooth limitations, the projector can only be controlled and used by one user. Check whether there are other users using the projector around, and reset the projector and add it again.
- Check if the distance between the Bluetooth gateway (your mobile device) and the projector I’d not more than or less than 3 meters. It is recommended to be as close as possible. (If there is no Bluetooth gateway, you can skip it and just connect to the phone directly).
If you are still unable to connect the projector to Alexa, contact the Kapebow or Smart Life support team for further assistance.
How to Connect Kapebow Light Star Galaxy Projector to Google Assistant
Here’s how to set up your Kapebow Light Star Galaxy Projector to Google Assistant:
Step 1: Download the “Smart Life” app from the App Store or Google Play Store. Once the app is downloaded, sign up for a new account or sign in with your existing account.
Step 2: Open the Smart Life app and tap the “+” icon in the top right-hand corner. Select “Device” and choose the “Lighting” category.
Step 3: Plug in your Kapebow Light Star Galaxy Projector and make sure it is turned on. Press and hold the power button on the projector until the indicator light blinks rapidly.
Step 4: In the Smart Life app, select “Lighting” and then “LED Strip Light”. Follow the on-screen instructions to connect your Kapebow Light Star Galaxy Projector to the Smart Life app.
Step 5: Once your Kapebow Light Star Galaxy Projector is connected to the Smart Life app, open the Google Home app and tap the Plus (+) icon in the top left-hand corner. Next, tap “Set up device” and then click “Works with Google”. This will take you to the screen where you can add new devices to your Google Home Assistant.
Step 6: On the next screen, search for “Smart Life” and select it from the search results. Sign in to your Smart Life account if prompted.
Step 7: Follow the on-screen instructions to link your Smart Life account to your Google Home Assistant.
Once the setup process is complete, you can start controlling your Kapebow Light Star Galaxy Projector with the Google Home app.
Kapebow Light Star Galaxy Projector Not Connecting to Google Assistant
If you are experiencing difficulty connecting your Kapebow Light Star Galaxy Projector to Google Assistant, here are some troubleshooting tips that you can try:
- Check your internet connection and ensure that your Kapebow Light Star Galaxy Projector is connected to a stable Wi-Fi network. You can also try resetting your Wi-Fi router to see if that helps after which you trys reconnecting again.
- Try resetting your Kapebow Light Star Galaxy Projector by turning it off and on again. You can also try unplugging it from the power source and plugging it back in the smart life app and then to Google Assistant.
- Try removing the Kapebow Light Star Galaxy Projector from the app and then setting it up again. This can help resolve any issues with the projector itself. Go ahead and connect to the smart life app following the setup steps above.
- Make sure that you have the latest version of the Google Home app installed on your device. You can check for updates in the app store.
- If you still have issues, try uninstalling and reinstalling the Google Home app. After reinstalling the app, set up your device again and your Kapebow Light Star Galaxy Projector should connect to Google Assistant.
If none of these troubleshooting tips work, you can reach out to the Kapebow support team for further assistance.
Kapebow Light Star Galaxy Projector Not Working
Are you having trouble with your Kapebow Light Star Galaxy Projector not working? Here are some simple troubleshooting steps to help you get your device up and running:
- Ensure that the projector is properly plugged into a working outlet. Sometimes, loose connections can prevent the device from turning on. Check to make sure that the power cord is securely connected to the projector and the outlet.
- Check for overheating. If the device has overheated, it may have automatically shut off so let the device to cool down before trying to turn it on again. This should prevent any damage to the device.
- If you are using a remote control to turn on the projector, check the batteries. Sometimes, the batteries in the remote control may be dead or low, preventing the device from turning on. Try replacing the batteries with new ones and see if that solves the problem.
- Check if the Kapebow Light Star Galaxy Projector has latches that hold the projector lens in place. If it has and any of the latches are open, the device may not work properly. Check to make sure all of the latches are securely closed before turning on the device.
Kapebow Light Star Galaxy Projector Instructions (Get this from the user manual)
Here are the Kapebow Light Star Galaxy Projector Instructions:
Step 1: Unbox your Kapebow Light Star Galaxy Projector and ensure that all the components are included in the package.
Step 2: Choose a suitable location for the projector, preferably a flat surface such as a table or a shelf, and make sure that it is at a suitable distance from the ceiling or wall.
Step 3: Plug the power cord into the projector and plug the other end into a power outlet. You can also use the included USB cable to power the projector if you prefer.
Step 4: Press the power button to turn on the projector. You should see the projection immediately.
Step 5: Use the remote control or turn on/off the projector. Make sure the remote control is pointing at the infrared sensor that is the “Remote Receiving Area” on the projector.
To change the projection angle, adjust the adjustable stand at the base of the projector. You can also use the remote control to change the color and brightness or set scenes. To further enjoy other features, connect it to the smart life app, Alexa or Google home app.
Kapebow Light Star Galaxy Projector Buttons Not Working
If the buttons on your Kapebow Light Star Galaxy Projector are not working, try the following tips to fix the problem:
- Turn off the device and unplug it from power. The buttons may not be responding because the projector itself has overheated. Allowing it to cool off may help fix the problem.
- If it’s the buttons on the remote control that are not working, first check and ensure that the batteries are working properly. If the batteries are dead, replace them. Next, check if the buttons are stuck. If they are, try to get them unstuck.
- If it’s the buttons on the projector itself that are not working, check for any dirt or debris around the buttons that may have gotten them stuck, and clean the buttons. Over time, dust can accumulate on the buttons and affect their responsiveness. To fix this, use a clean and dry cloth to gently clean the buttons, and then see if they work.
If the tips above don’t work, there’s a chance the buttons are damaged, and you may need to replace them. Alternatively, you can reach out to the Kapebow support team for further assistance.
Kapebow Light Star Galaxy Projector Not Blinking
If your Kapebow Light Star Galaxy Projector is not blinking, here are some tips you can try to fix the problem:
- First, check the Power Source and make sure that the projector is properly plugged into a working power source. If the power source is not working, try plugging the projector into a different outlet.
- Check the Bulb on the projector to confirm it has not burned out or damages. If the bulb is burned out, you will need to replace it or restart the device to see if the bulb would come on.
- Reset the Projector. To do this, turn it off and unplugging it from the power source for a few minutes. Then plug it back in and turn it on again. Alternatively, press and hold down the power button for some seconds until the projector starts to blink.
If none of the above steps resolve the issue, contact the Kapebow support team for further assistance.
Final words
The Kapebow Light Star Galaxy Projector is a fantastic addition to any space with its beautiful starry night projection and customizable lighting modes. However, encountering issues during set up or during use can be frustrating.
But by following the troubleshooting tips and set up instructions provided in this guide, you can ensure a smooth and seamless experience with your Kapebow Light Star Galaxy Projector.